


Have you ever had a user run a query against one of your largest tables only for them to immediately filter the results in Excel to show the last years worth of data? All of that data brought across your network and then immediately filtered out. Or maybe Excel just can handle the amount of unfiltered data they’re trying to return.
In this post, I’d like to show you a way to solve this problem with Power Query in a solution that can dynamically filter your data returned based on user driven parameters.
In the scenario that I will demonstrate, rather then returning an entire result of all the company’s employees, I just want to return a list that show employees with a hire date within a certain range of dates that I or a user will provide. Using Power Query’s ability to make queries into Functions I’ll give my user the ability to provide the range of their choice
Connect to the Data
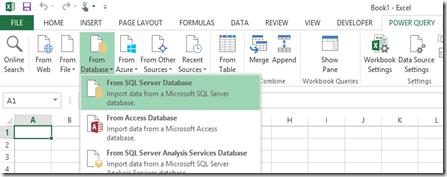
- In my example I’m going use a SQL Server table as my data source but it could be any type of table. To connect to a SQL Server table from the Power Query tab in Excel select From Database > From SQL Server Database. For my example I’ll be using the AdventureWorksDW sample database.

- Next you will be prompted to provide your Server and Database names where the table is located. Type these in then click OK.
- Once you provide the Server and Database name you will also be prompted for the credentials you will use to access the data then click Connect.
- The Navigator pane will appear showing all the available tables. If you’re following my example with the AdventureWorksDW sample database then choose DimEmployee and then click Edit. This returns back the table to the Power Query Editor. **Note** This could be done on any table from any database.
Making the Query a Function
- What I’d like to have my users do is return back this list of employees but only when the HireDate column falls within a range of values that they provide. To do this we’ll start by applying a hardcoded value to filter to the HireDate column. Find the HireDate column and apply a filter by clicking the down arrow next to the column and then Date Filters > Between

- The range of values you filter on will depend on your table but for the DimEmployee table in AdventureWorksDW I used the following filter then clicked OK.

- This simple places a filter on the query. If we want to make the filter dynamic we need to modify the M Query that’s behind the user interface. Go to the View tab on the Query Editor ribbon and select Advanced Editor. This will open the query window where you can modify

- Next modify this query to add in a start date and end date parameter with the code in red below.
(startdate, enddate)=>
let
Source = Sql.Database("localhost", "AdventureWorksDW2012"),
dbo_DimEmployee = Source{[Schema="dbo",Item="DimEmployee"]}[Data],
#"Filtered Rows" = Table.SelectRows(dbo_DimEmployee, each [HireDate] >= #date(2000, 1, 1) and [HireDate] <= #date(2002, 1, 1))
in
#"Filtered Rows"
- Once the parameters are created you can reference them in the query to replace the hardcoded value in the filter with a dynamic value from the parameters. Modify the query with the code in red below then click Done.
(startdate, enddate)=>
let
Source = Sql.Database("localhost", "AdventureWorksDW2012"),
dbo_DimEmployee = Source{[Schema="dbo",Item="DimEmployee"]}[Data],
#"Filtered Rows" = Table.SelectRows(dbo_DimEmployee, each [HireDate] >= #date(Date.Year(startdate), Date.Month(startdate), Date.Day(startdate)) and [HireDate] <= #date(Date.Year(enddate), Date.Month(enddate), Date.Day(enddate)))
in
#"Filtered Rows"
- This will convert the query into a function. You can test this function by clickingInvoke and then you will be prompted to provide date values to filter on.


- If you did invoke the function make sure you remove the Invoke step before moving on. You can do this by clicking the delete icon in the Applied Stepspane.

- This should return the query back to a function ready to be invoked. Now, go to the Home tab on the Query Editor ribbon and select Close & Load.
- This will save the M Query function into the workbook but does not return any results yet. Just how we want it! Our next step is to pass the values we want into the function.

Making the Query User Interactive
- Go to a blank spreadsheet and create a simple Excel table that has a StartDate and Endate column with one row of values like this:

- To make it so our users can type a value in this Excel Table and pass it into our function we need to take bring this small table into Power Query. Select one of the cells inside the table and on the Power Query tab select From Table. This will take the content of this table and bring it into the Power Query Editor.

- To pass these two values into our function go to the Add Column tab and select Add Custom Column.
- Write the following formula to connect the DimEmployee function created earlier to the dates we’ve now defined in the Excel table then click OK:
DimEmployee([StartDate],[EndDate])

- If all your default settings are turned on inside Power Query you will probably get a privacy warning pop up. This is because you’re working with two different data sources (1. SQL Server Table, 2. Excel Table) and there’s potential privacy concerns. In our scenario there are no legitimate privacy concerns so I’ll hit Continue. I also set the data sources to Organizational because the data sources should be contained within my company. Read more about Power Query privacy settings here.

- Once the privacy settings are configured Power Query will add in a new column just called Custom (We could have renamed it previously). Click theExpand button next to the Custom column, uncheck Use original column name as prefix and then click OK. This will bring back all the rows that have hire dates between our date range.

- Go ahead and remove the StartDate and EndDate columns from the query now but multi-selecting them and then right-click and select Remove Columns.
- Next, rename the query in the Query Settings pane to Employee Data then clickClose & Load on the Home tab.
- You should now have two spreadsheets (It would obviously be a good idea to rename these) in your workbook.
- Sheet1 that has the Excel table with the date range values
- Sheet2 that has the results of the Power Query query. This data could have optionally been send to the Power Pivot Data Model
- Now go back to Sheet1 and change the date range values in the StartDate and/or EndDate columns. After making this change the next time the Power Query query is refreshed it will pick up the results from the table to filter on saving your users from query a really large table when they only need a subset of the data.
Power Query Finishing Touches
If my users aren’t very familiar with Power Query and don’t know how to refresh their queries then we can build a quick little macro to provide a button that does it for them. Using a technique I learned from Ken Puls (blog | twitter) in a few short steps our macro will be done. In Ken’s post titled Refresh Power Query with VBA he shows how to refresh all Power Query queries in a workbook with a little VBA script. I’m going to take the same principles he shows but just refresh the query I care about.
- In your workbook press Alt + F11
- Right-click on VBAProject(Book1), this may be named something different if you’ve saved with a new name, in the Project Explorer and select Insert > Module.

- Use the following VBA script to refresh the workbook connection for our Employee query we created earlier (If you named your query something different you may need to adjust the section highlighted in red):
Public Sub UpdateEmployeeQuery()
‘ Macro to update my Power Query script(s)
Dim cn As WorkbookConnection
For Each cn In ThisWorkbook.Connections
If cn = "Power Query – Employee" Then cn.Refresh
Next cn
End Sub
- Hit close on the VBA window.
- To manually try the new code hit Alt + F8 and you will be prompted to run the script. Select the Macro we just created and click Run.

- You should notice this kicks off the refresh of our Employee query.

- To turn this into a button go to the Developer tab. Instruction on how to make the Developer tab visible. https://support.office.com/en-nz/article/Show-the-Developer-tab-e1192344-5e56-4d45-931b-e5fd9bea2d45
- Select Insert > Button

- Click somewhere in the worksheet that you want the button and then select the Macro we created to assign to the button. Click OK.

- Click inside the button to rename it and then you’re all set!
- Now all you have to do is change the values in the table and click the button to refresh the results of the query. This works if the results are rendered to an Excel spreadsheet or Power Pivot Data Model.

As long as the data source and types of transforms support it Query Folding will still be utilized with this method. If you’re curious about what Query folding is read more about it in this Matt Masson post.
I’ve made this example available if you would like to download it: User Driven Parameter Example.xlsx

.png)


-1.png)
Leave a comment